Working with Color Gradients
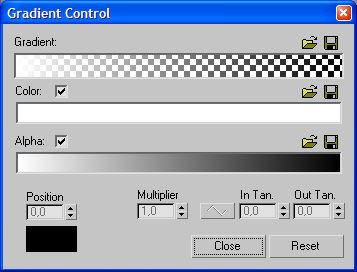
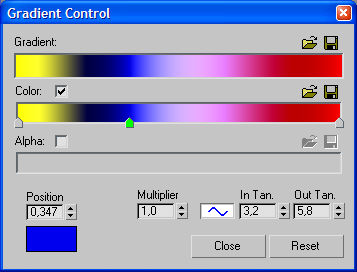
finalFluid offers unique enhanced color gradient features. The gradient dialog looks similar to the one in 3ds max. However, finalFluid offers many more features than you might think at first glance, including ramp or curve color change types and infinite color flags. The gradient dialog is divided into four main areas.
Gradient Preview - The gradient preview is the top most color gradient of the gradient dialog. This color range represents the actual color and fading you would see in the final rendering. As you add colors in the gradient below, updates of the gradient window are displayed in real time.
This color preview also shows how the gradient colors blend into the background. The background is represented as a checkerboard pattern, which helps identify the transparency values.
The gradient dialog presents a very detailed preview of the result you can expect. However, please understand that there will always be some difference between rendering the effect and checking the colors in the gradient dialog.
Color Gradient Setup - The second, and main part in the Gradient window, is a gradient that controls how each pixel is colored. The color range is calculated from left to right (Start to End).
You can set as many color keys as you want by left-clicking within the color ramp. When you do so, a standard 3ds Max color picker dialog opens to let you choose the color. Press OK if you like the color.
Whenever you change the color in the color picker dialog, you will get real-time feedback within the color range. Once a color key is set, you are able to shift it along the color display (from Start to End point). If you move a color key across another key, you will see that the color shifts completely to the other side.
Keyboard Shortcuts
|
To copy a color key |
hold Shift + Drag left mouse button |
|
To select multiple color keys add/remove |
hold Ctrl + left mouse button |
|
To delete a color key |
double right-click on key or selection |
|
To evenly space color keys |
hold Ctrl + double left-click any key |
|
To drag-and-drop Color Gradients |
hold Alt + left mouse drag |
Linear Bezier Switch - Another feature that makes the controls truly unique are Non-Linear Gradients. The easiest way to understand the difference between linear and Bezier gradients is to play with the parameters.
You will see that Bezier color gradients are the most powerful gradients available for 3ds Max, because Bezier gradients usually need fewer color keys to generate complex color blending. In fact, it's amazing what you can do with only three keys: here is an example that shows the difference between the settings.
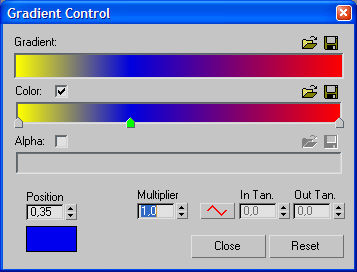
The image shown above represents a standard linear Gradient. The yellow color is blending in a linear manner into the blue and then into the red. Note the 1.0 Multiplier value!
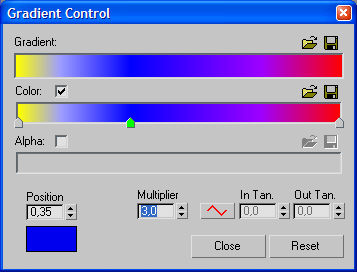
This gradient is still a linear gradient, however the Multiplier value is set to 3.0. This value controls the "spreading" of the color to both sides of the color key. Note how dramatically the violet has broadened in the center of the gradient.
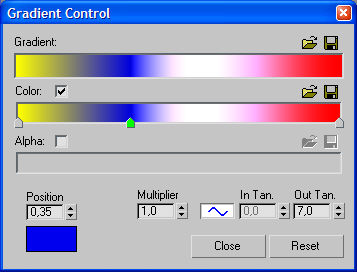
Here we have a great example of how easy it is to get a complex color blend with only three color keys. Note the two additional values (the wave icon and the Out Tangent value). Only the middle key is a Bezier type.
This is what you get when all the keys are turned into Bezier keys. There are still only three keys controlling the color blending. Usually you would need a minimum of twelve keys to get the same result using linear controls.
How does it work?
The interface you see below is the key to the rainbow colors of your wildest dreams. As you might have expected the Linear/Bezier button (the sine wave) switches between linear or Bezier behavior (each key has its own settings). The values have the following meaning (from left to right):
Multiplier - This spinner controls the color spreading to both directions of the selected key.
In Tan. - This spinner controls the color spreading to the left side of the selected color key.
Out Tan. - This value controls the color spreading to the right side of the selected color key.
NOTE:
When you use Bezier color keys you need to be sure about the influence of the values described above. You can only control the right or left side of a color key when there is a left or right side.
If your color key to the right is linear, you can't expect to have full control over the color range. As an easy rule of thumb, always use Bezier keys on all color flags to get the most artistic control over your color blending.
The Alpha Blending Gradient - The third major color control in the gradient dialog is the Alpha Blending window. This gradient is a gray scale gradient only. A full white RGB:255,255,255 gradient from Start to End is 100% opaque, while a full black RGB:0,0,0 gradient from Start to End is 100% transparent.
This transparency gradient also offers Bezier color keys for advanced blending options: more gray values will create smoother blending.
Position - This control represents the color of the selected color key. It also shows the exact position of the color key. This makes life easier when adjusting critical color gradients. If no key is selected, the color swatch is black. This color swatch is also perfect for drag-and-drop operations to set colors for the selected key.